Min.io: the S3 open-source alternative
Table of Contents
Min.io: the S3 open-source alternative
Today I would like to talk about a software that I have used in a couple of projects. This software can be used to be to upload files to an online storage exactly as you would do with AWS S3.
The need in this case was to have a system on which to upload static files online to be able to give to users. In this way I wouldn’t have had to manage the authentication of the users myself but I would have had a software that allowed me to do it directly. This is exactly the kind of system I’ve already found in the past with other software like Swarmpit and it saved me a lot of time.
In addition to being able to upload their own static files, users must also be able to access them via HTTP get requests later on. This will allow them to develop their own applications and use online storage just like Amazon S3.
Let’s start
- Software installation
- Manage Buckets
- Handle Users
- Create meaningful policies
- Add Groups
- Make it (almost) free for all
Software installation
The guide on the official website with excellent work in explaining how to do the installation of this software and can be found at this link:
MinIO | Learn more about MinIO’s Docker Implementation
I think the fastest way to start using this software is to install it via Docker
docker run \
  -p 9000:9000 \
  -p 9001:9001 \
  -e "MINIO_ROOT_USER=AKIAIOSFODNN7EXAMPLE" \
  -e "MINIO_ROOT_PASSWORD=wJalrXUtnFEMI/K7MDENG/bPxRfiCYEXAMPLEKEY" \
  quay.io/minio/minio server /data --console-address ":9001"
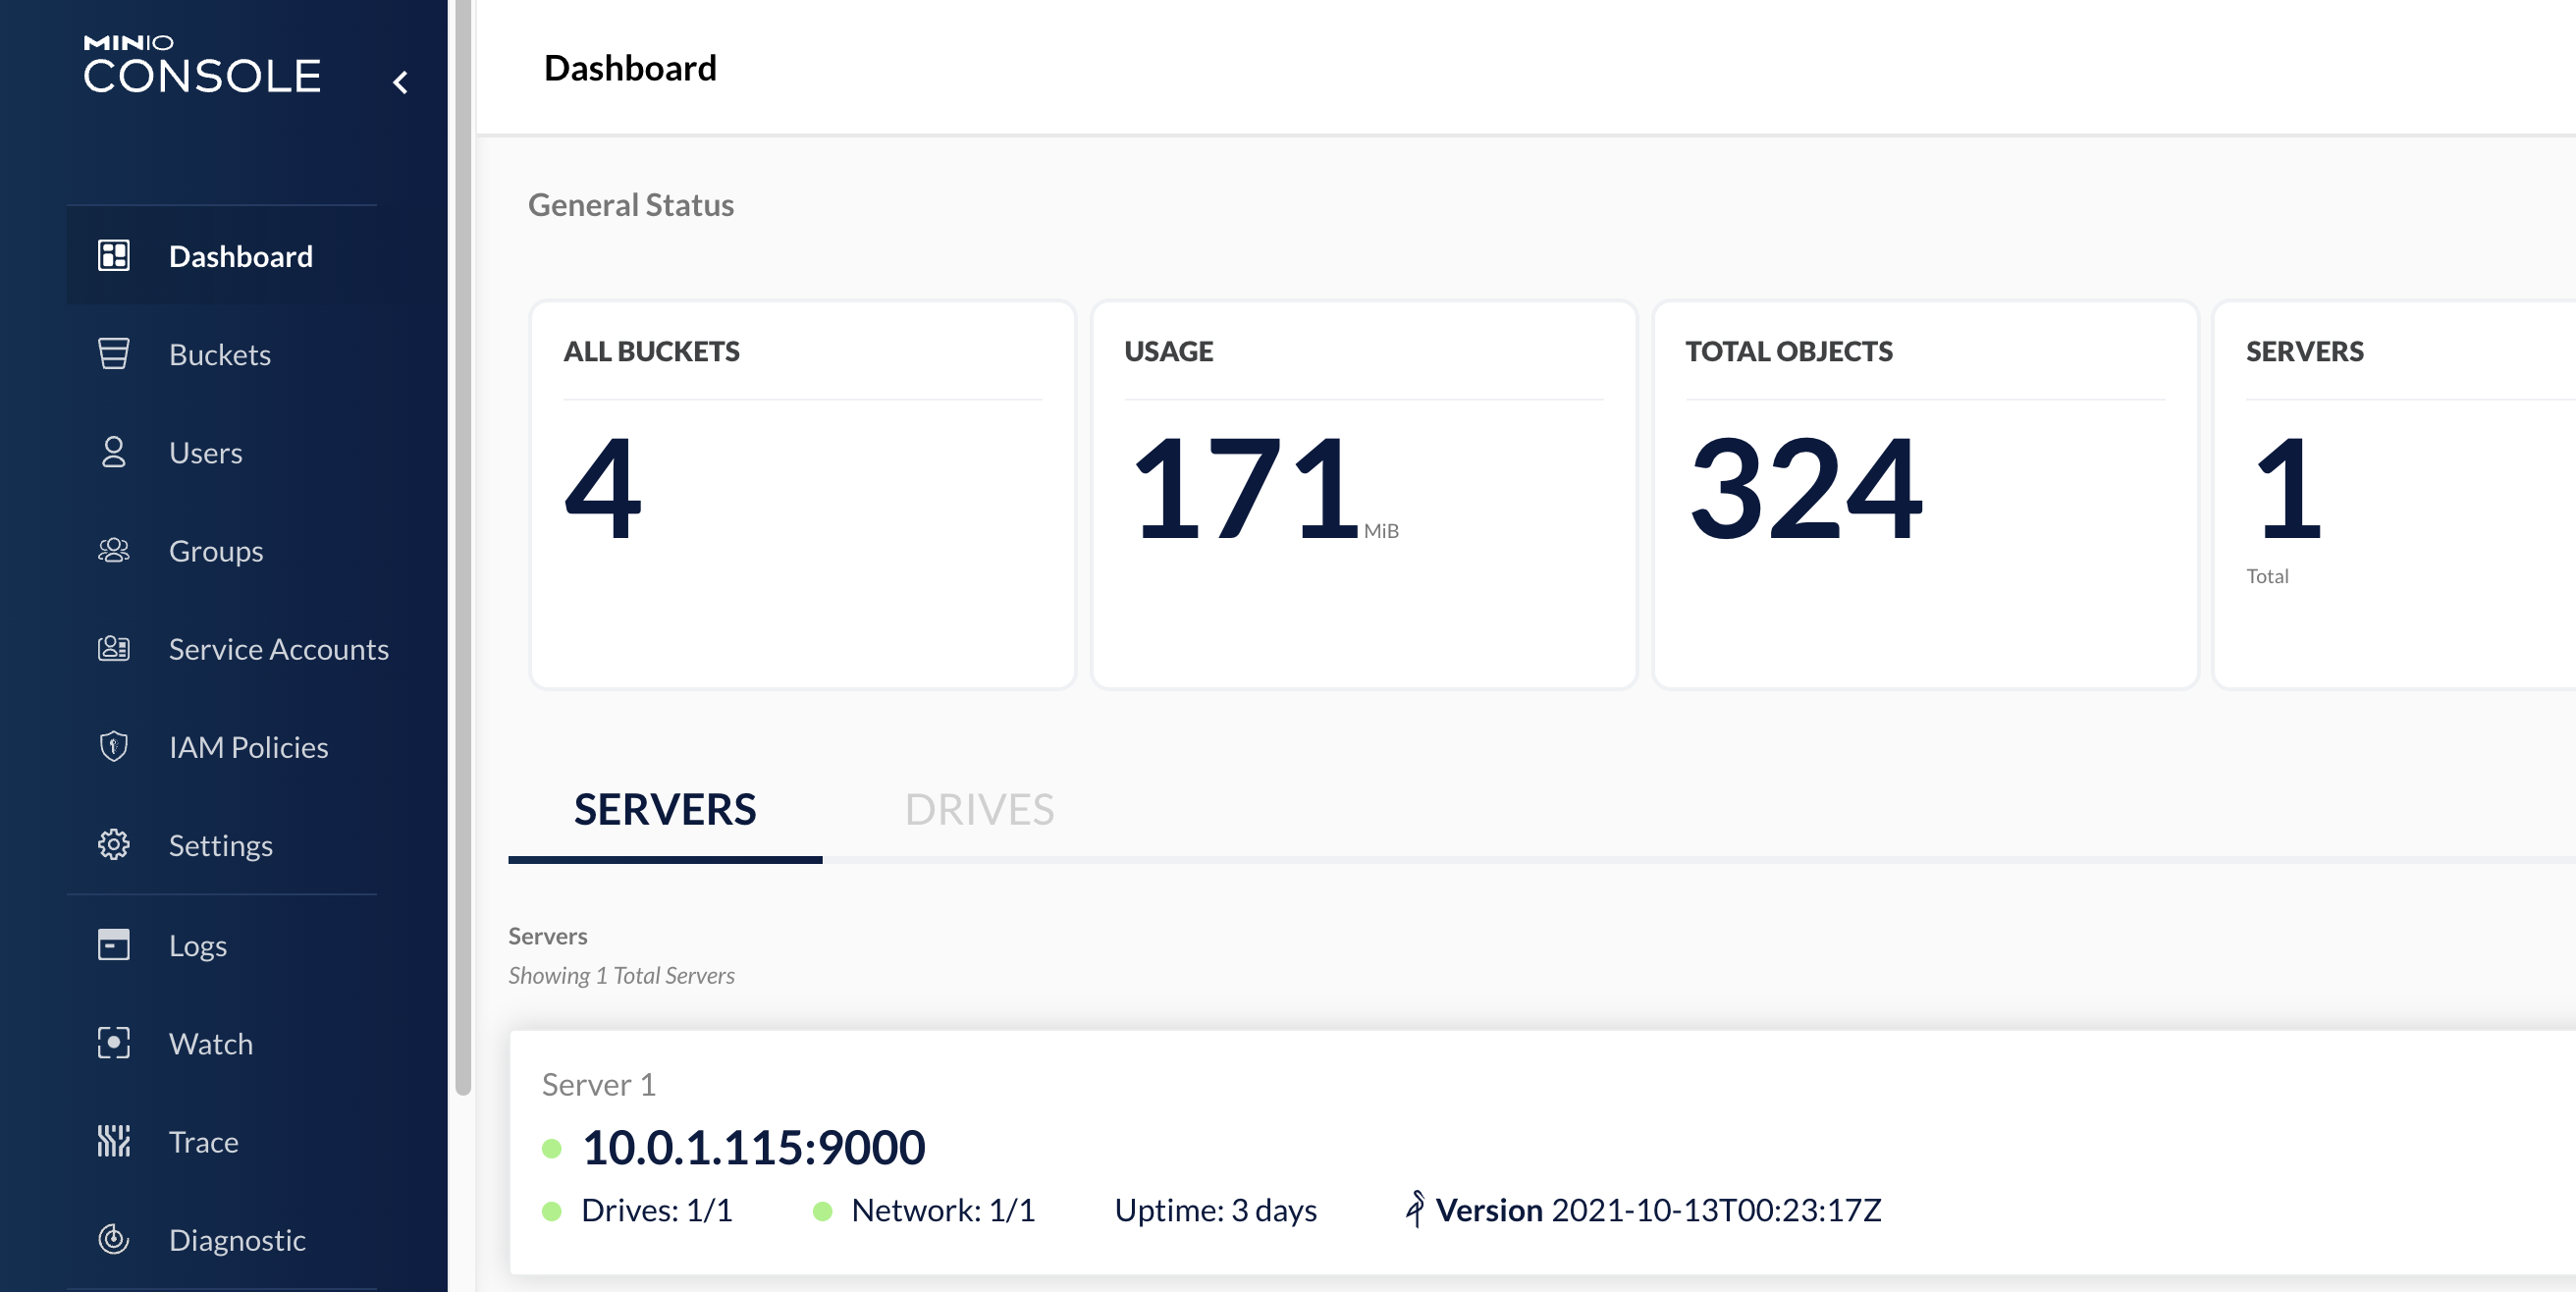
With a simple command we have already an instance running
Manage Buckets
The concept of a bucket could be familiar to anyone who has ever previously used a key-value based online storage system. In this case in fact we have “containers” that act as folders called buckets. Within these, we have our items saved in a different structure than the classic hierarchical structure that we can see within the file system. This is a structure based on key-value, where the key looks like the address of the path where our object is located while the value is the content of the file itself.
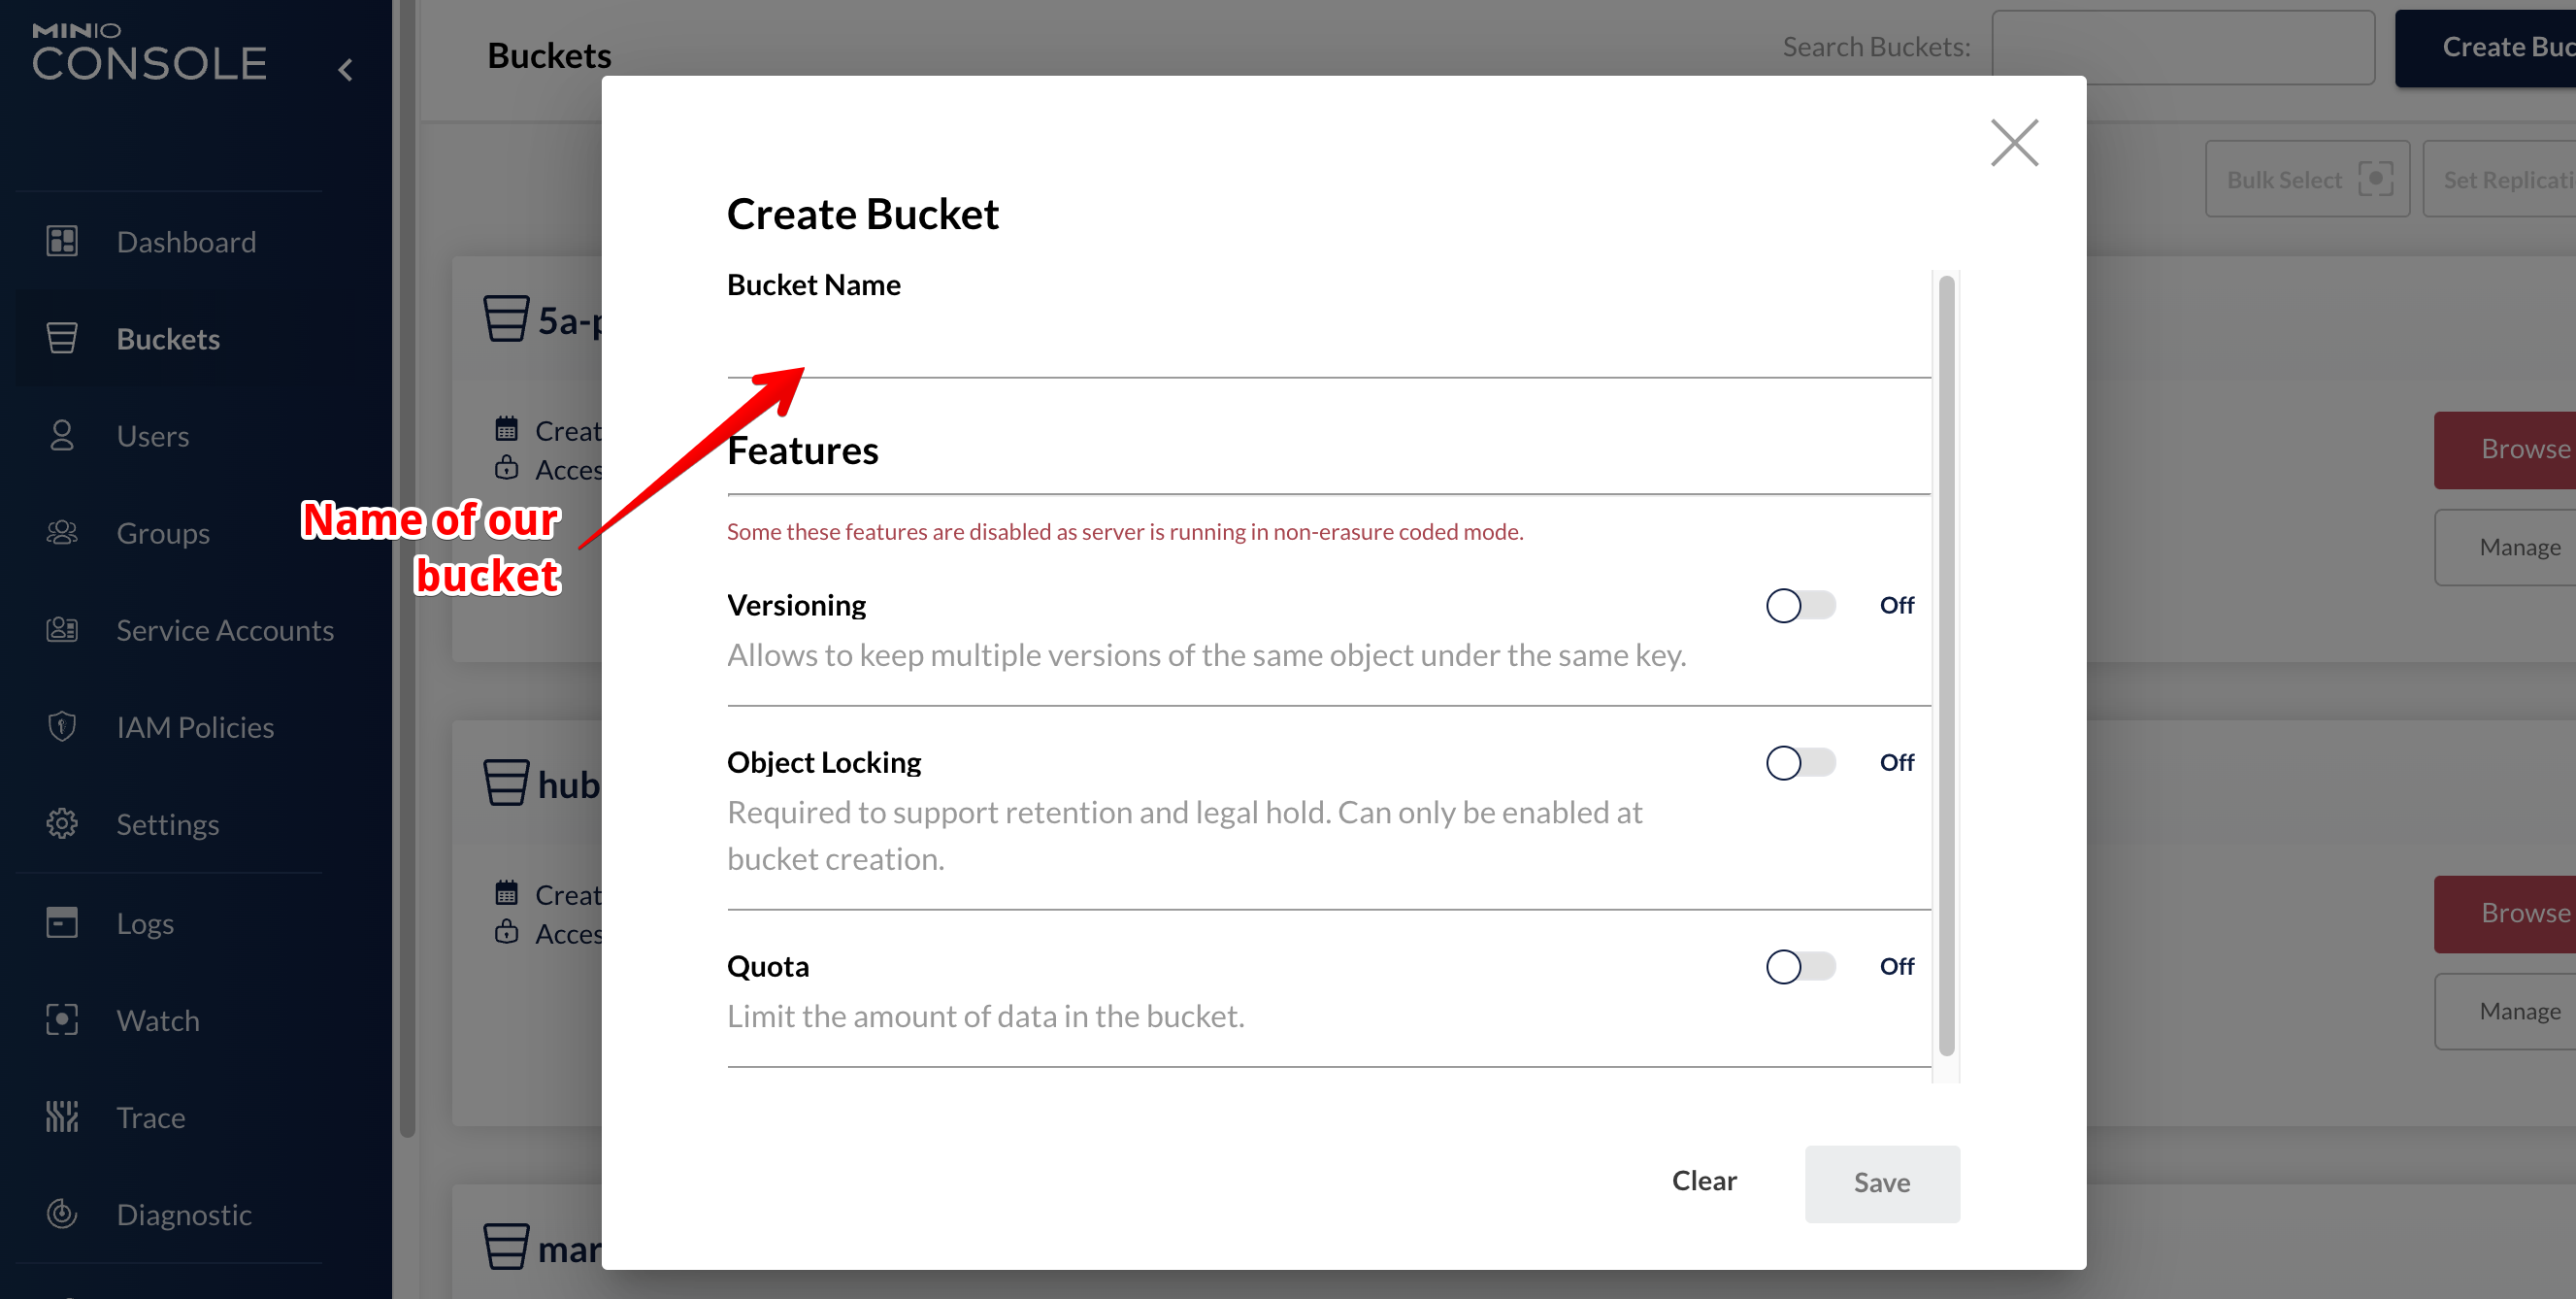
To create a new bucket just enter the appropriate section and press the button in the upper right corner. Recently the interface has changed in some aspects so the version you are using probably could be different from the one I used in this guide.
Once you have created your bucket you can go inside it and upload new static files. You can also create new folders, but these are different from normal folders: they may look like the folders we have inside our file system in our computer but actually they are just a way to represent our path with a more known notation.
Handle Users
In MIN.io you can create new users directly from within the platform who will be able to access the Dashboard and use the features. Once we select the users button from the left bar of our screen, we will be in a page where we could create our users. In the upper right corner we have the button create new user and once pressed we should enter only some data
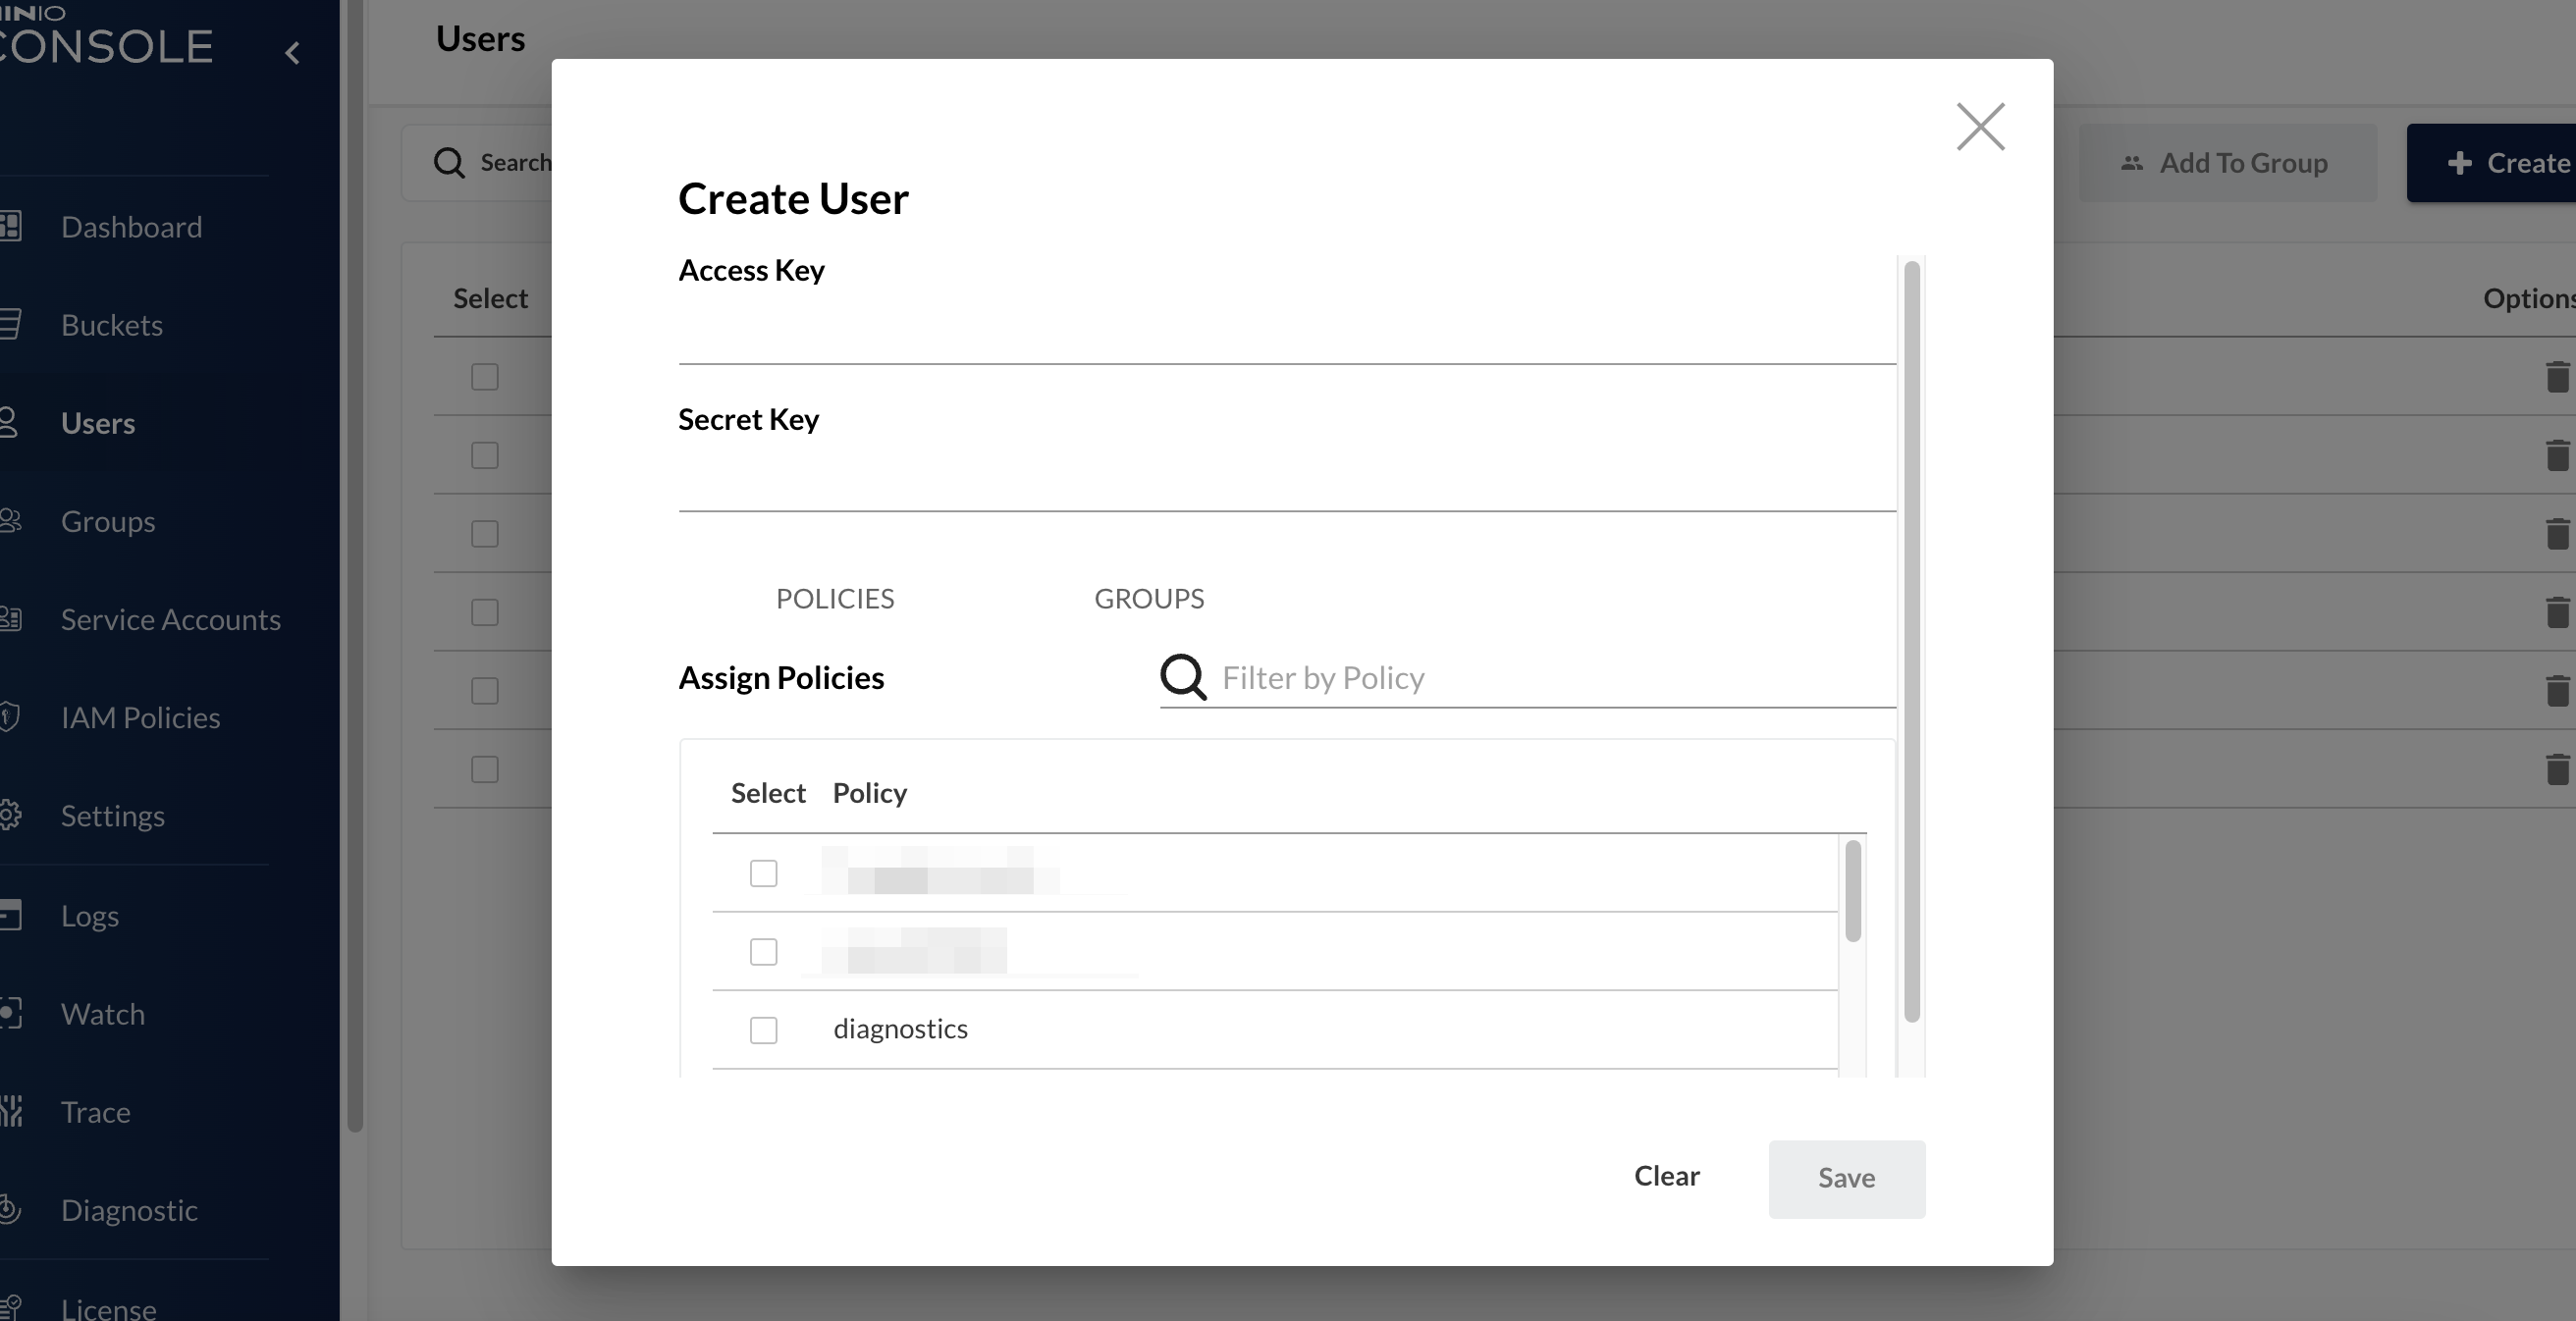
(was it really necessary to add the blur effect to those two policy fields? No, it was not… but I really wanted to try it out)
When we go to create a new user we have to enter the two necessary information that are “Access Key” and “Secret Key”. These will be used not only to login to the main Dashboard, but also later to be retrieved via API.
Once we have created our user we need to take care of giving him permissions to access the information and the Buckets we want him to see. This, exactly as it happens within Amazon S3 is the result of a meticulous work with the correct assignment of policies. Let’s see what these are
Create meaningful policies
Policies are documents in JSON format that contain the list of all rules regarding a resource. In this case we are going to consider users and user groups as resources that can access the buckets. Let’s see now how to structure these policies.
{
  "Version": "2012-10-17",
  "Statement": [
    {
      "Effect": "Allow",
      "Action": ["s3:*"],
      "Resource": ["arn:aws:s3:::help_aid/*"]
    }
  ]
}
The one above is an example of a policy that allows access to a Bucket named help_aid within those we created. As you can see, it uses exactly the same notation as Amazon S3.
Let’s now look at some slightly more useful cases:
Selective allow
This example in particular allows the user to view all the buckets there are but to operate only inside the help_aid bucket on the objects that are under the test path
{
  "Version": "2012-10-17",
  "Statement": [
    {
      "Effect": "Allow",
      "Action": ["s3:ListBucket"],
      "Resource": ["arn:aws:s3:::help_aid/*"]
    },
    {
      "Effect": "Allow",
      "Action": ["s3:*"],
      "Resource": ["arn:aws:s3:::help_aid/test*"]
    }
  ]
}
Explicit Deny
This instead, allows the user to perform operations on the whole bucket except for all paths underlying test.
{
  "Version": "2012-10-17",
  "Statement": [
    {
      "Effect": "Allow",
      "Action": ["s3:*"],
      "Resource": ["arn:aws:s3:::help_aid/*"]
    },
    {
      "Effect": "Deny",
      "Action": ["s3:*"],
      "Resource": ["arn:aws:s3:::help_aid/test/*"]
    }
  ]
}
Add Groups
Creating policies to assign to individual users is not the best idea: this is due to the fact that each time we would have to keep track of individual users and what policies they have available to them. To avoid this you can use groups.
This feature means that you can group users by a category that you want, and assign that category certain policies that you want to have for all users. A practical example of this is the following: suppose we have a group of users that we want to have access to the back at the development but don’t have the possibility to access the marketing one. In this case it’s enough that every time a development user is created, this user is assigned inside the correct category.This category, or group, will have at its disposal the necessary policy to enter only inside the correct budget.
Free for all
At this point, we understood how this software works. For my need, however, it was necessary to make a small change because it did not perfectly meet my use case. In fact, reading the documentation of MIN.io documentation you can see that it has not been set up to provide a static URL that can be used to get the files inside its buckets. These files can still be used programmatically through APIs but this is often not the case.
Supposing we have a simple application that needs to download via HTTP get some images or other static content from a server, we want to have the possibility to access a predefined path where we know we can find our files. To achieve this effect I decided to use a combination of two different container types: one that was MIN.io while the other a static file web server.
The combination of these two in fact allows me to share the volume on which the uploaded static files can be found and at the same time allows the uploading of these files in an authorized way only through the software of MIN.io.
Here is a scheme to simplify what we said:
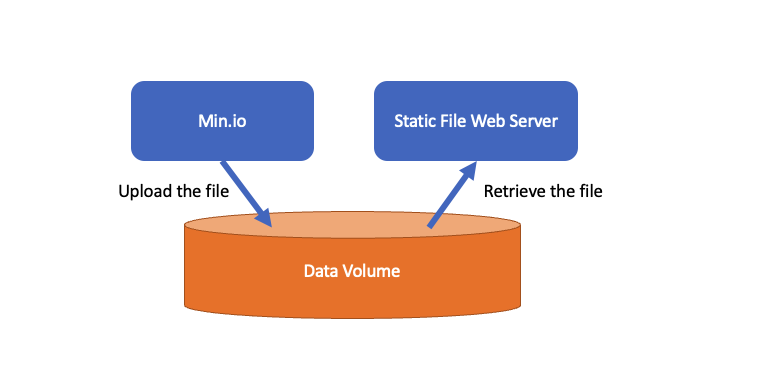
which can be expressed like in the following docker-compose.yml file:
version: "3.7"

services:
  nginx:
    image: halverneus/static-file-server
    volumes:
      - fs_data:/content
    networks:
      - net
    environment:
      CORS: "true"
      FOLDER: "content"
    deploy:
      labels:
        caddy: $STATIC_ACCESS_URL
        caddy.reverse_proxy: "/* {{upstreams 8080}}"
        caddy.tls.ca: "https://acme-v02.api.letsencrypt.org/directory"

  minio:
    image: minio/minio
    volumes:
      - fs_data:/data
    networks:
      - net
    environment:
      MINIO_ROOT_USER: $MINIO_ROOT_USER
      MINIO_ROOT_PASSWORD: $MINIO_ROOT_PASSWORD
      MINIO_BROWSER_REDIRECT_URL: $MINIO_CONSOLE_URL
    command: server --console-address ":9001" /data
    healthcheck:
      test: ["CMD", "curl", "-f", "http://localhost:9000/minio/health/live"]
      interval: 30s
      timeout: 20s
      retries: 3
    deploy:
      labels:
        caddy_0: $MINIO_CONSOLE_URL
        caddy_0.reverse_proxy: "/* {{upstreams 9001}}"
        caddy_0.tls.ca: "https://acme-v02.api.letsencrypt.org/directory"
        caddy_1: $MINIO_URL
        caddy_1.reverse_proxy: "/* {{upstreams 9000}}"
        caddy_1.tls.ca: "https://acme-v02.api.letsencrypt.org/directory"

volumes:
  fs_data:
    name: fs_data
    external: true

networks:
  net:
    name: caddy_network
    external: true
We have to add a note to this thing: it’s true that this system allows to have static files publicly reachable without needing any control, but this could be a problem. In fact some users could take these links and use them on their own platforms thus increasing our bandwidth consumption. To avoid this it would be necessary at least to implement a CORS policy in order not to allow other sites besides the ones we want to access and download freely our static files.
comments powered by Disqus